Why I bought the Alfred Powerpack

If you haven’t heard of Alfred, check it out. It’s basically a Spotlight replacement with a lot of power.

If you use Alfred but not sure if you should buy the Powerpack, check out some of the cool things you can do with it in this GitHub repo.

Alfred is probably my #1 productivity tool on the Mac. Anything is literally a few keystrokes away.

Alfred also integrates with Dash. Dash is an offline, quick, searchable documentation tool. Combine Dash with Alfred, and you get documentation for your favourite language or library literally in a few keystrokes.

Instant documentation

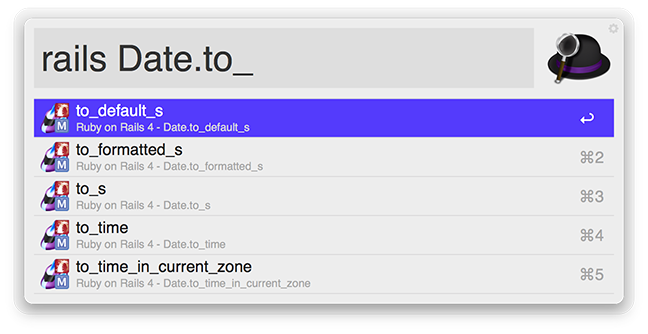
Dash isn’t free (though there is a free trial), but if you’re willing to invest in some great developer tools that would save you time, this combo works great.

Finally one more thing I love about Alfred: opening Google Docs. If you install Google Drive, your Google Docs, Sheets, and Presentations will be downloaded and synced. Then you can open any Google Doc using Alfred (type ‘open’ followed by the filename), and it will open the Google Doc in the browser. I found this really quick and useful because it means I don’t have to have a browser open, go to Google Drive, and search for the file.

I was actually wondering if anyone has done a Google Drive Workflow for Alfred that would allow this functionality without having to download and sync all your files using the Google Drive app. It turns out no one has done it. I might take a look and see if I can integrate some of Google Drive’s APIs with Alfred Workflows to see if this is possible.

TIL How a Java Debugger Works

I’m working with my friend on a project to implement a web based debugger for Java projects. Today I learned all about the Java Debug Interface (JDI, which I like to pronounce as ‘Jedi’).

It’s essentially an event-driven request/response API that allows all the features that a debugger supports - step over, step into, breakpoints, stack inspection, etc. For example, say we want to set a breakpoint on a certain line number. First, we load the target class, then create a breakpoint request, wait for the response which tells us the breakpoint event was handled successfully. Now, we can look at the stack at this point and inspect variables.

Add some websocket wizardry, and you can hook it up with a web application.

If you’re interested in the details, head over to the GitHub project https://github.com/jameslawson/webjdb.

Why a web based Java debugger? Aren’t you reinventing the wheel?

The idea isn’t to bring a fully-fledged code editor to the web. Plenty of those exist. Instead, the idea is to quickly debug an existing Java project in the browser. This simplifies the task of the web app - we don’t care about writing code, we just care about a simple and purpose-built debugging experience. It’s also useful for people who use Vim or Sublime instead of an IDE. Finally, at the moment this is just a proof-of-concept experiment. We’ll see how it goes.

Setting up my dev environment on a new Mac

Here’s what I do when I get a new Mac / reinstall OSX.

The absolute essentials

  1. Download chrome. Already, everything is synced. Awesome.
  2. Download Alfred. This is my go-to tool for opening just about anything. It’s so good I actually bought the powerpack.
  3. Download Spectacle for easy and powerful window management.
  4. Download iTerm. This is my preferred terminal environment.
  5. Set up a global keyboard shortcut for opening iTerm.
  6. Install homebrew. Once we have this, we have everything. When installing homebrew, it will also install the Apple Command Line Developer Tools. Yay.
  7. brew install all the things. I normally brew install node first as I am a self-proclaimed JavaScript fanboy.
  8. Install Sublime Text 3. Unless you’re a vim wizard. In that case ignore steps 1-7. Vim will suffice.

Make the terminal awesome

Dat terminal do

  1. Download oh-my-zsh. I can’t be bothered explaining the benefits of zsh over bash but you’ll feel the power of zsh as soon as you start using it.
  2. Set up zsh-syntax-highlighting. Gives instant visual feedback to tell you what you’re about to execute is correct. e.g. If you type the command “echo” incorrectly, it will show in red. If you type it correctly, it will show in green (like the above screenshot), before you actually execute the command.
  3. Download tomorrow-night-eighties theme for iTerm2. To do this, save this file as ‘Tomorrow Night Eighties.itermcolors’ and open it. iTerm2 will import it. Then, choose it in iTerm > Preferences > Profiles > Default > Colors > Load Presets…
  4. Set up pure prompt. This will add stuff like nicer git integration, timing functions (see screenshot above), and other neat tricks in your terminal. To do this, save this file as ‘pure.zsh’. Then run:
    1
    2
    mkdir ~/.oh-my-zsh/functions
    ln -s /path/to/pure.zsh ~/.oh-my-zsh/functions/prompt_pure_setup
  5. Restart iTerm.
  6. At this point, I like to set up my zshrc aliases. Sublime Text is an important one. Add this to the end of your .zshrc file:
    1
    alias subl="'/Applications/Sublime Text.app/Contents/SharedSupport/bin/subl'"
    Cool, you can now edit files in your terminal using the subl keyword! (Try it on folders too!)

Other stuff

Set up your ssh keys:

  1. Open a terminal and type ssh-keygen
  2. Repeatedly press enter (feel free to give a password if you want)
  3. Copy your public key and put it into your github account.
    cat ~/.ssh/id_rsa.pub | pbcopy

Set your git user name and email:

1
2
git config --global user.name "Your Name"
git config --global user.email you@example.com

Set up git lg alias, a better git log:

1
git config --global alias.lg "log --color --graph --pretty=format:'%Cred%h%Creset -%C(yellow)%d%Creset %s %Cgreen(%cr) %C(bold blue)<%an>%Creset' --abbrev-commit"

JIT App Installations.

A lot of people install all the apps they could possibly need in the future right after they do a fresh install. I used to do this. Then I realised the majority of this time is time wasted. A better approach is to install apps on the fly when you need them. This will save you time, and also some precious disk space! Package and app managers (like npm or the App Store) make installations really quick and easy. So install the essentials and forget the rest!

Your browser is out-of-date!

Update your browser to view this website correctly. Update my browser now

×